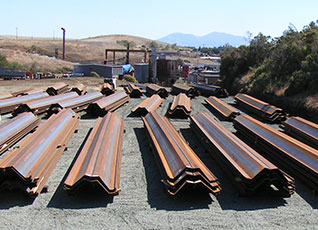
Setting & Driving Tips forZ-Profile Sheet Piling
Improper setting and driving practices result in problems and costs that far out-weigh the initial expense of applying correct methods from the start. Although setting and driving techniques may vary according to the site conditions and/or the contractor's level of experience, several basic principles can be applied.
Use an adequate template
The utilization of an adequate steel template will facilitate the installation process and result in a superior end product. The purpose of the template is to both properly align the sheets during the setting process as well as to keep the sheets in alignment during the driving phase. Since a typical sheet weighs one ton or more, the template obviously needs to be of rugged construction. Also, bear in mind that the template will normally be used and moved multiple times at the job site; this is another reason for a well-designed and solidly constructed template.
Mark the template
To maintain the published laying width of the sheeting, it is very important to mark the template for each sheet, or pair of sheets. By following this procedure, the contractor can observe if the line being set is gaining or losing wall length. This procedure is important for installations such as: cofferdams, which must be closed; or anchored bulkheads, where tie-rod locations are critical. Depending upon the length of the sheets, the template might be one, or two - or more - tiers high. In order to maintain a plumb wall when driving sheets in excess of 50 feet (15 meters), a two-tier template is always suggested as a minimum.
Set a panel of piling
The length of the panel will vary depending upon site conditions, the contractor's experience, and other factors. In general, you might expect a panel length of 25 to 45 feet (8 to 14 meters). As each sheet, or pair of sheets, is set, the sheets may be rotated as necessary in the interlock (as shown below) in order to match the marks on the template.

Set and drive with the ball-end leading
When the piles are set and driven with socket-end leading, the socket becomes clogged with soil and the ball must force the soil out of the opening. In some types of soils, such as very fine and dense sand, the resistance of the soil in the socket can be such that driving becomes impossible without damaging the sheets. Under such conditions - particularly with a vibratory hammer - it is possible to actually weld interlocks together.
If for some reason, the sheets must be driven with the socket-end leading, such is the case when using an interlock sealant like WADIT, then place a bolt or some object in the socket at the bottom end to at least minimize clogging.
Keep the sheets plumb
It's of utmost importance that, as each pair is set, the sheets are plumb and secured before the next pair is set. Once the wall is allowed to get out of vertical alignment, the mistake will only get worse; and at some point the contractor will simply have to quit, extract the out of plumb sheets, and start over. The most important tool of the pile driving crew is a long level: 3 feet (1 meter) or more in length.
Drive the panel of sheets in stages
Piles driven full length in one operation are more prone to deflect and go off line. This is particularly true when the soil contains debris, boulders, or other obstructions. Subsequent piles are guided by the deflected section; and within a short length of wall, pile driving comes to a halt. The sheeting must then be pulled, and the wall has to be restarted. The preferred process to minimize, if not eliminate, this problem is to first set a panel of sheets and then work the panel down as a unit. This is accomplished by driving the sheets (singles or paired), in increments using a defined sequence. The magnitude of the increment will be determined by the soil conditions. In general, the harder the driving, the less the driving increment - perhaps 6 feet (2 meters) in easy driving, versus 3 feet (1 meter), or less, in denser soil. Panel driving allows the piles to be guided by previously driven piles, and it lessens the possibility of driving the piles out of interlock. During this phase, as during the setting process, it's important that constant attention be paid to maintaining a plumb wall. Any deviations from being plumb that are detected should be quickly corrected before things get out of hand.
Driving is ideally, and normally, accomplished by driving pairs. However, if driving becomes difficult due to obstructions or pockets of dense soil, simply drop back and drive single sheets. This is another advantage of not crimping or welding pairs.
Avoid splicing if possible
Randomly selecting Z-piles to splice could result in attempting to splice two cross sections together that do not match. This results in added time and costs. If splicing is required, then the sheets should be ordered full length from the production mill. They should be cut and match-marked at the site. These sections can then be spliced back together to reconstruct the original sheet. This procedure reduces the mismatching of cross sections and improves section geometry match. In order to avoid creating a plane of weakness in the wall, the splices on adjacent sheets must be staggered by a minimum of 3 feet (1 meter) or more, if feasible. When splicing the pile, it's impossible to weld in the interlocks due to both the difficulty of welding in this area and the distortion caused by the heat from the welding. If full section modulus is required at the splice, it will be necessary to provide flange plates to make up for the loss of section modulus in the interlocks. Normal practice allows for a combination of butt-welding of the flanges and web, along with the addition of flange plates by fillet welding. Light "seal" welds around the perimeter of the interlocks will prevent the flow of water and soil through the splice.
Setting and Driving Tips for PS Flat Sheets in Closed Cells
Although setting and driving techniques vary with the individual contractor and site conditions, several basic principles can generally be applied. It should be realized that the lack of good setting and driving practices can result in job delays and an unsatisfactory structure. The following suggestions are offered to help avoid problems at the site:
- Handling of PS sections. These sections have very little modulus (beam strength) and are, therefore, very susceptible to handling damage. It is important that great care be taken when transporting or lifting these sections. When sheets exceed 70 feet in length, they should be lifted at two or more points.
- Have an adequate steel template. Longer sheeting lengths will require a two or three tier template with tiers spaced 15 feet (4.5 meters) or more apart. For example, a contractor should consider at least a two tier template when installing 70 foot (21 meters) or longer sheets as this will facilitate setting and driving and result in a superior end product. The diameter of the template is predicated on the contractor's experience and method of setting circular cells. It is important that the template diameter be less than the theoretical cell diameter in order to easily close the cell. Upon filling, the finished cell will expand to meet or exceed published values. When a cell with long lengths is being constructed, it may be advisable to stiffen the starter sheet by reinforcing it full length with a structural shape. Site conditions such as swift water or hard driving may require more reinforcement.
- Splicing of PS sections. When it is necessary to splice PS sections the splice point on adjacent sheets should be staggered by several feet.
- Mark the driving template for each pile or pair of piles. This allows for wall adjustments to be made during the setting phase, insuring that the sheets are located properly for cell closure.
- Insure that the sheets are properly interlocked when set. Improper interlocks become the "weak links" and result in job delays and/or failures. Set all sheets in the cell before driving any of the sheets, other than nominal pinning of the starter sheet(s).
- "Shake out" several sheets at any closure point. "Shake out" several sheets at any closure point: Following good practice as noted above should ideally result in the last sheet sliding smoothly down into the remaining gap. Although the first sheet is set plumb and the next to last sheet is plumb, the chances that the remaining gap is uniform (19.69 in.) the full length is improbable. Picking up and dropping, or "shaking out," several sheets near the closure point until the sheets run smoothly will minimize the chance of driving sheets out of interlock.
- Drive piles in pairs. Once sheet piles are threaded and set, it is more economical to drive two at a time. (Some experts suggest that the energy needed to drive a pair may be only 50% more than that required to drive a single pile.)
- Drive piles in stages and work around the entire cell by alternating sheets (pairs). This allows the piles to be guided by those previously driven, and lessens the chance of driving sheets out of interlock. The distance a pile, or pair of piles, should be driven at any one time will be governed by the driving conditions. In the first pass around the cell, every other pair is driven perhaps 4 ft. In the second pass around the cell, the un-driven pairs are driven 8 ft, 4 ft restrained by the adjacent pairs and then 4 ft into virgin soil. This procedure is continued until the cell is driven to design tip elevation. Good practice, in order to keep the cell plumb, is the reverse the direction of driving for each pass around the cell.

6 North America Locations
Our service and support staff, located in six regional offices throughout North America, will analyze the details of your requirements to ensure we have the right equipment for your job. We sell, rent, and service high quality equipment from all around the world, including pile drivers, drilling rigs, impact hammers, pile products, and much more.